About Me
- Redbutterfly78
- Eigentlich erwachsen aber immer noch vielzuviel Kind in mir ... a big girl but a little girl inside of me
My Blinkie

Ct From


I Use Tube from


Dienstag, 26. Juli 2011
My Bonnie is over the Ocean...

Supplies Needed:
PSP
Font of choice
Mask from KRD
save in mask folder
***** Live with Porpoise *****
It is available at CoolscrapsdigitalTube of choice
I used
Nikky the Sailor by Legends Art
you can get at
http://scrapsandthecity.com/
please don't use without a license.
my Template

ok let´s begin
~~~~~~~~~~~~~~~~~~~~~~~~~
Open new Image
600x600
select all
open cbg_livewithporpoise_paper04
copy paste into selection
new Layer
open cbg_livewithporpoise_paper09
copy paste into selection
deselect
go Layers-load/save Mask-
load mask from disc-
kdr27
select - fit to layer
deselect Invert Transparency
Merge Group
load mask from disc-
kdr27
select - fit to layer
deselect Invert Transparency
Merge Group
go to your Raster deform tool and
pull the upper edge of the image to
pivot y 400
Open cbg_livewithporpoise_porpoise01.
Copy and paste as a new layer. Resize by 50%
Copy and paste as a new layer. Resize by 50%
2x.
Give it a drop shadow of your choice.
Open cbg_livewithporpoise_splash01
Copy and paste as a new layer
Copy and paste as a new layer
move a little to left
Open cbg_livewithporpoise_birds
Copy and paste as a new layer
Resize by 80%
move a little to top
Dropshadow
Open cbg_livewithporpoise_boat04
Copy and paste as a new layer
move little to right
Open cbg_livewithporpoise_splash01
Copy and paste as a new layer
Copy and paste as a new layer
resize by 50%
move it slightly to the right into the picture
so it looks as is the boot between the waves
merge all visible
open my Template
Delete Copy
go to layer
fishnet
go to adjust-Hue and Saturation-
Colorize
with
Hue 25 saturation 43
Colorize
with
Hue 25 saturation 43
Layer backbig
click with your Magic wand toll into the black
copy the Pic what we make
paste into selection
deselect
roundback1-4
copy parts from Image
paste into selection
deselect
open cbg_livewithporpoise_frame03
Resize by 80% 2x
Copy and paste as a new layer
put over Backbig
Decorate the taggi
i take
cbg_livewithporpoise_binoculars
cbg_livewithporpoise_bow01
cbg_livewithporpoise_bird01
cbg_livewithporpoise_preserve02
merge visible
resize 80% deselect all layers
canvas size
800x800
open cbg_livewithporpoise_paper09
copy paste as a new layer
arrange under the layer from template
go Layers-load/save Mask-
load mask from disc-
kdr27
select - fit to layer
deselect Invert Transparency
Merge Group
load mask from disc-
kdr27
select - fit to layer
deselect Invert Transparency
Merge Group
copy and paste
your tube
your tube
arrange over the layer from template
move to place of choice
merge all layer visible
add name
add artist copyrights
add name
add artist copyrights
Freitag, 22. Juli 2011
alone in Paradise

Supplies
1 Artist's tubes -
I've used the beautiful artwork of
misticheskaya
1 Artist's tubes -
I've used the beautiful artwork of
misticheskaya
You can purchase her tubes at her store
HERE
please don't use without a license.
PTU Kit ~Gypsy Rosa - Li
from
Bello Scarto
It is available at
open vix mask in your PSP
minimize
minimize
new image 650 x650
select all
Open bello-2011-grl-paper2
.Copy and paste it into a selection
deselct
go to Layer-
New mask layer-from image-
mask vix250
deselect -invert mask data
deselect -invert mask data
merge group
rename back
Open bello-2011-grl-element40.
Copy and paste as a new layer. Resize by 80%
position on the left side on top
rename rainbow
Open bello-2011-grl-element44.
Copy and paste as a new layer. Resize by 60%.
Move the lower left hand side of your frame.
Give it a drop shadow of your choice.
Duplicate it
resize 60 %
merge down
Duplicate it
and mirror
rename grass
Open bello-2011-grl-element34.
Copy and paste as a new layer. Resize by 60%.
Move the left hand side of your frame.
Give it a drop shadow of your choice.
Open bello-2011-grl-element34.
Copy and paste as a new layer. Resize by 60%.
Move the left hand side of your frame.
Give it a drop shadow of your choice.
rename bridge
open your tube
resize to 650pix
copy paste as a new layer
position on the bridge
rename tube 1
Open bello-2011-grl-element10. Copy and paste it as a new layer.
Go to image effects-reflection-kaleidoscope
. Leave where it is.

rename frame
Open bello-2011-grl-element51.
Copy and paste as a new layer.
Move the left hand side of your frame.
Give it a drop shadow of your choice.
Resize by 60%.
Move little to left
merge down
duplicate
mirror
rename mushroom
Open bello-2011-grl-element6.
Copy and paste as a new layer. Resize by 40%.
Move the left hand side of your frame.
Give it a drop shadow of your choice.
Duplicate it and mirror.
duplicate flip
duplicate mirror
rename bow1 bow 2 bow 3 bow 4
go to layer tube 1
take your selection tool
Rectangle-make it like me

ctrl-C
add new layer
arrange over the layer bow4
paste into selection
deselect
go to layer with the tube 1
dropshodow of your choise
merge all visible
copyrights and any other text you would like to add.
Montag, 18. Juli 2011
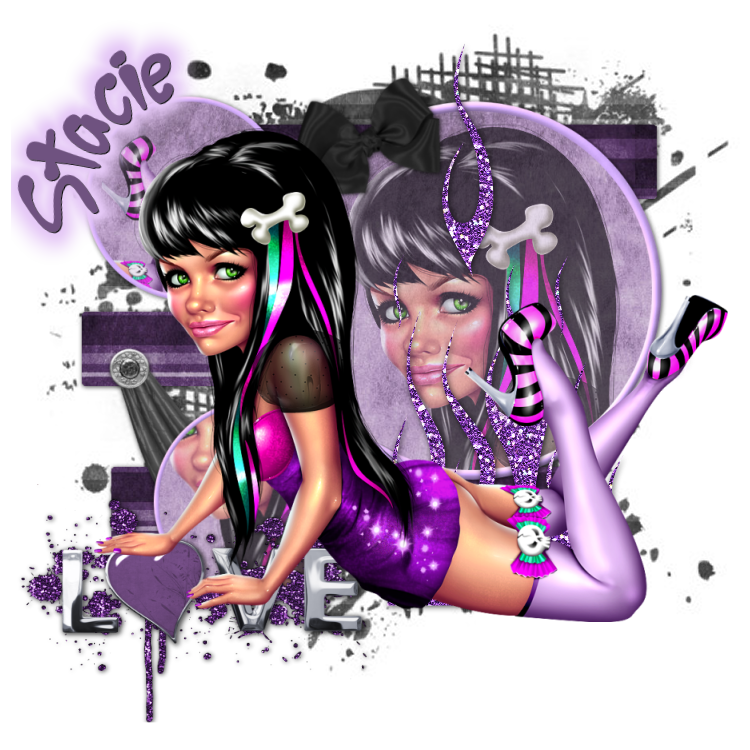
Purple Dream

Supplies
1 - 3 Artist's tubes -
I've used the beautiful artwork of
Barbara JensenYou can purchase her tubes at her store
HERE
please don't use without a license.
PTU Kit ~Flapper Clara
from
Mystic Creations
It is available at Heartbeatz Creationz.
~Font of choice ~
~my Template~

~~Let's Begin~~
Open my template - duplicate and close original - delete copy.
Go to layer Back
go to adjust-Hue and Saturation-
Colorize
with
Hue 189 saturation 255
layer Doodle
go to adjust-Hue and Saturation-
Colorize
with
Hue 199 saturation 131
dropshadow 1/-1 100 1
go to your Flood fill toll
Match mode -RGB Value
tolerance 0
sample merged deselct
Blend mode normale opacity 100
open MCFCTSPaper 15
Go to material properties
pattern search
MCFCTSPaper 15
Angle 0
scale 100
klick in Frameinside1 -fill
repeat these steps
by layer Frameinside 2 and 3
copy and paste
your tube
arrange under the frameout2 layer
take your selection tool
Rectangle-make it like me

ctrl-C
add new layer
arrange over the frame
paste into selection
deselect
go to layer with the tube
dropshodow of your choise
repeat these steps
by layer Frameout 1 and 3
with another tube or close up from your tube
Copy and paste Element
MCFCTSFlower Ornament
as a new layer
placement on left side from the big frame
dropshadow
0/0
62
Blur 9
duplicate
resize 50 %
image-mirror
put them on the
MCFCTSFlower Ornament
Copy and paste Element
MCFCTSRecord
as a new layer
arrange under layer
Frameinside1
placement on left side from the big frame
duplicate
resize 50 %
image-mirror
put them on the rigth side
to the Frametop
Copy and paste Element
MCFCTSLace Wrap 01
resize 32%
as a new layer
arrange over all layers
placement on left little frame
dropshadow
0/0
62
Blur 9
duplicate
image-mirror
put them on the rigth little frame
Copy and paste Element
MCFCTSWrap Crossover 01
resize 32%
as a new layer
arrange under the layers from
MCFCTSFlower Ornament
placement on big frame
dropshadow
0/0
62
Blur 9
merge all layer visible resize
rename taggi
new layer
arrange under the taggi
fill with color
#2c1237
go Layers-load/save Mask-
load mask from disc-
gabeemask33
select - fit to layer
select Invert Transparency
Merge Group
Copy and paste Element
MCFCTSDouble Satin Bow 02
resize 30 %
put to the left top
rotate a little
duplicate-image-mirror
go to your taggi
resize 90 %
Now pull the tag at the bottom edge of the mask
merge all layer visible
add name
add artist copyrights
Sonntag, 17. Juli 2011
Happiness is like...german

Benötigte Materialien:
PSP
Schrift deiner Wahl
PSP
Schrift deiner Wahl
Tube deiner Wahl
Ich habe für dieses Tutorial Tuben von
Ich habe für dieses Tutorial Tuben von
*Ismael Rac*
genutzt
Maske von WSL http://weescotslasscreations.blogspot.com/
WSL_mask297
Ich habe für dieses Tutorial das
PTU Kit *Kiss me* von Lysiras Graphic World genutzt.
Du kannst es hier bei Heartbeatz Creationz kaufen
Ihren Blog findest du hier

und mein Template

******************************************
ok dann laß uns anfangen
Öffne mein Template
dupliziere es mit Ctrl & D
dupliziere es mit Ctrl & D
lösche die Ebene Copy
geh nun zu deinem farbeimer
Auswahlmodus-RGB Wert
Toleranz 0
alle ebenen verwenden deaktiviert
Deckfähigkeit 100 %
Öffne lgw_kiss_me_paper01
geh zu den Materialeigenschaften
folgende einstellung
Muster lgw_kiss_me_paper01
Winkel 0
vergrößerungsfaktor 100
nun klick mit dem eimer in Heartback
widerhole diese Schritte bei Back1,2,3,
aber nimm
lgw_kiss_me_paper05
Ebene Heartframe
geh zu
anpassen-farbton/sättigung
Kolorieren
Farbton 235 Sättigung 255
widerhole diese Schritte bei ebene
frameset
words 2
und Lips
öffne deine Tube oder ein Close up
-kopieren als neue ebene einfügen
über ebene frameset
Schlagschatten
nun radiere alles weg was du nicht brauchst
widerhole das bei Back2,3 und heartback
denk dran die tuben müssen über den wörtern sein
**********
nun haben alle rahmen eine tube
dann kommt nun die Deco
lgw_kiss_me_heart02 kopieren und einfügen als neue Ebene
und schieb es oben ins große herz
unter die pin ebene
Schlagschatten
lgw_kiss_me_heart01 kopieren und einfügen als neue Ebene
und schieb es unten in den kleinen mittleren Rahmen
unter die pin ebene
Schlagschatten
ebene Backgrund stell nun bitte sichtbarkeit aus
die restlichen ebenen
sichtbar zusammenfassen
background sichtbar stellen
lgw_kiss_me_paper02 fülle damit background
ebenen -maske laden/speichern
maske laden
WSL_Mask297
übernimm einstellung
an ebene anpassen
tranzparent umkehren inaktiv
nun noch
fruppe zusammenfassen
alle
ebenen
sichtbar zusammenfassen
denk an das copyrigth der tube und deine Lizenznummer
fertig sind wir
Samstag, 16. Juli 2011
Happiness is like...

WSL_mask297
This tutorial was created with Lysiras Graphic World - Kiss me kit.
It is available at Heartbeatz Creationz.
You can visit lys blog here.
my Template
It is available at Heartbeatz Creationz.
You can visit lys blog here.
my Template
*Let’s get started*
Open the template,
Ctrl & D to duplicate and close the Original.
layer copy delete
go to your Flood fill toll
Match mode -RGB Value
tolerance 0
sample merged deselct
Blend mode normale opacity 100
open lgw_kiss_me_paper01
Go to material properties
pattern search
lgw_kiss_me_paper01
Angle 0
scale 100
klick in Heartback -fill
repeat these steps
by layer Back1,2,3,
but take
lgw_kiss_me_paper05
layer Heartframe
go to adjust-Hue and Saturation-
Colorize
with
Hue 235 saturation 255
repeat these steps
by layer frameset
layer words 2 and Lips
go to adjust-Hue and Saturation-
Colorize
with
Hue 235 saturation 255
Copy and paste your close up image from your tube
as a new layer above the layer Back1
arrange over layer Frameset
Dropshadow
erase the parts you don´t need
make the step by all layers back2,3 and Heartback
please thing the words must under the tube
*****************************
ok now all frames have a tube ..
now we decorate
Copy and paste lgw_kiss_me_heart02
as a new layer
placement on Heart like mine
dropshadow
0/0
62
Blur 9
arrange under layer heartpin
Copy and paste lgw_kiss_me_heart01
as a new layer
placement on frameset
arrange under layer pinframeset
Dropshadow
make layer Background invisible
merge all layer visible
make layer Background visible
open lgw_kiss_me_paper02
go Layers-load/save Mask-
load mask from disc-
WSL_Mask297
select
fit to layer
Deselect Invert Transparency
Merge Group
merge all layer visible
add name
add artist copyrights
Freitag, 15. Juli 2011
Faces of Innocence

Supplies Needed:
PSP
Font of choice
This tutorial was created with KiKeKa Kits ***** Ruby
It is available at Coolscrapsdigital
PSP
Font of choice
This tutorial was created with KiKeKa Kits ***** Ruby
It is available at Coolscrapsdigital
Tube of choice

save in PSP and PSD image
******************************************************
Open the template,
Ctrl & D to duplicate and close the Original.
layer copy delete
layer freestyleback
go to adjust-Hue and Saturation-
Colorize
with
Hue 25 saturation 48
Layer Frame1in
go to your Flood fill toll
Match mode -RGB Value
tolerance 0
sample merged deselct
Blend mode normale opacity 100
open cbg_ruby_paper06
resize to 800x800
Go to material properties
pattern search
cbg_ruby_paper06
Angle 0
scale 100
fill frame 1 in
Copy and paste your close up image or a part from your tube
as a new layer above the layerFrame1in.
Dropshadow
go to layer frame1 in
selection-select all-
selecton Float-defloat
Invert
go to the layer with tube
Tap the delete key.
Deselect.
Layer Frame1 out
go to adjust-Hue and Saturation-
Colorize
with
Hue 25 saturation 48
effects 3d-inner bevel

merge down -merge down
now is frame1in ,tube and frame1 out 1 layer
Dropshadow
repeat these steps
by layer Frame2in/Out
Frame3 in/out
but change the Paper and part of tube
ot take a other tube
now you take all pins to the place you will
go to layer wire
open cbg_ruby_scatter03
resize 35%
copy paste as new layer above wire
Dropshadow
open cbg_ruby_branch02
resize 25%
copy paste as new layer above scatter
rotate a little to left
Dropshadow
open cbg_ruby_butterflies
resize 15%
copy paste as new layer above Frame3
Dropshadow
placement on left side
open cbg_ruby_tag02
resize 10%
put it to a place you like
Dropshadow
merge all layer visible
Add your name ,your copyright and licence numbers
Dienstag, 12. Juli 2011
Kiss me....

Supplies
1 tube of choice - I used the artwork of Ismael Rac
1 tube of choice - I used the artwork of Ismael Rac
here
save in your Mask Folder
This tutorial was created with Lysiras Graphic World - Kiss me kit.
It is available at Heartbeatz Creationz.
save in your Mask Folder
This tutorial was created with Lysiras Graphic World - Kiss me kit.
It is available at Heartbeatz Creationz.
You can visit lys blog here.
*Let’s get started*
Open up a 700 x 700 blank canvas.
fill with lgw_kiss_me_paper10
go Layers-load/save Mask-
load mask from disc-
from the heart Mask 3
select
fit to layer
Deselect Invert Transparency
Merge Group
rename Mask1
new layer
Fill with Paper
lgw_kiss_me_paper01
go Layers-load/save Mask-
load mask from disc-
mask181_sigrid
select
fit to layer
Deselect Invert Transparency
Merge Group
now you go to Selection-
select all-
selection-Modify-contract
8
selection-invert-cut
deselect
go to effects
Alien Skin-eye candy 5 Impact-Gradien Glow
Ghost Text

rename Mask2
Copy and paste Element
lgw_kiss_me_colordrops01 as a new layer
arrange under layer Mask 2
rename deco 1
placement on left top side
Duplicate-
Image- Mirror
Image -Filp
rename deco2
go to layer Mask 2
activate
Copy and paste Element
lgw_kiss_me_ribbon02 as a new layer
placement on left side
dropshadow
0/0
62
Blur 9
rename ribbon
Copy and paste Element
lgw_kiss_me_flower02 as a new layer
resize 50 %
deselect all layers
effects
Reflection-kaleidoscope

Dropshadow
rename flower
new layer
go to your selection tool
make a selection
from the middle of the left flower to the right flower
fill with
lgw_kiss_me_paper02
now you go to Selection-
selection-Modify-contract
15
Cut
rename frame
arrange under layer Flower
merge layer Flower down to layer-frame
Now drag this frame in the picture down
copy your tube
paste as a new layer
placement of your choise
arrange under layer Ribbon
rename tube 1
take your selection tool
Rectangle-make it like me

ctrl-C
add new layer
arrange over the frame
paste into selection
rename tube 2
go to layer tube 1
effects-3d- dropshadow
2/2 100 Blur 18 color #000000
Copy and paste Element
lgw_kiss_me_plate01 as a new layer
resize 50 %
placement of your choise
Merge all layer visible
add name
add artist copyrights
Montag, 11. Juli 2011
Gothic Romance

Supplies Needed:
PSP
Font of choice
Mask of your choice
I am useing a UFMask13
I dont know who made this mask if you want to use the same mask
you can grab it HERE
save to your mask folder
I dont know who made this mask if you want to use the same mask
you can grab it HERE
save to your mask folder
StacieCakes PTU Kit Gothic Romance
tube of choice
I used
save in PSP and PSD image

Open the template,
Ctrl & D to duplicate and close the Original.
layer copy delete
Fill layer 1-Paper SC_GRP8
dropshadow 1/1 72 blur 9
repeat these steps
by layer 2 & 3
layer 1,2 and 3 merge down
Copy and paste SC_GRE_Drape1
arrange under layer 4
put little to left and rotate
Dropshadow
Layer 4 fill with paperSC_GRP7
Copy and paste your close up image or a part from your tube
as a new layer above the layer4.
Selections/Invert
Tap the delete key.
Deselect.
opacity 60 %
repeat these steps
by layer 5 & 6
but change the part of tube
layer 7
go to adjust-Hue and Saturation-
Colorize
with
Hue 192 saturation your choise
effects 3d -inner bevel
Tap the delete key.
Deselect.
opacity 60 %
repeat these steps
by layer 5 & 6
but change the part of tube
layer 7
go to adjust-Hue and Saturation-
Colorize
with
Hue 192 saturation your choise
effects 3d -inner bevel

repeat these steps
by layer 8 and 9
merge visible the layer 4-9
dropshadow
Copy and paste SC_GRE_Bow1
resize 40 %
arrange over layer 9
put to left side from the frame from layer 9
Dropshadow
Copy and paste SC_GRE_Bow2
resize 20 %
arrange over layer 8
put to right side from the frame from layer 8
Dropshadow
merge all layer visible
resize 80 %
all layer deselect
Copy and paste your tube as a new layer.
Position in front of the picture of your choise
copy and paste
SC_GRE_Flames1
arrange under layer with your tube put little to right
dropshadow
copy and paste SC_GRE_WordArt1
resize a little
arrange under layer with your tube put little to left side
Dropshadow
merge-visible
new layer arrange under layer merge
select all
copy and paste into selection paperSC_GRP10
deselect
layer-load/save Mask-
search UFMASK 13
select fit to layer
invert trancparency
merge visible
add name
add artist copyrights
i hope you have Fun
Dienstag, 5. Juli 2011
Burlesque

Supplies Needed:
PSPFont of choice
Scrapkit PTU-Burlesque
PSPFont of choice
Scrapkit PTU-Burlesque
tube of choice
I used
Leonardo55_Alexia
you can get at
http://picsfordesign.com
In order to use the images in this tutorial you must purchase them from

Open the template,
Ctrl & D to duplicate and close the Original.
layer copy delete
Paper07-layer 1+2
Layer4 -colorize of your choise
paper4 -layer5
new raster
copy your tube
paste into selection
opacity 54
deselect
same with layer 6
Layer wire ,shadow1,2,3,4,9,words ,wordshadow,pin1-3,invisible
go layer 5
merge visible
dropshadow
0/0
62
Blur 9
layer all visible
layer word
selection-select all-
selecton Float-defloat
fill with color #4b1312
Dropshadow
Layer9 -colorize of your choise
activate layer pin 3
copy element 14
to your image as a new layer
placement on left side from the big frame
Dropshadow
copy element 36
to your image as a new layer
resize a little
placement on left side
Dropshadow
copy element 8
to your image as a new layer
resize a little
placement on left top side
arrange under the pin layer
Dropshadow
copy your tube
paste as a new layer resize of 550 pix
please think deselect all layers
Move to the end of the pic
Dropshadow
2/2
62
Blur 17
the same with -2/-2
Merge visible
Add your name ,your copyright and licence numbers
Sonntag, 3. Juli 2011
Alexia

Benötigte Materialien:
PSP
font der Wahl
Scrapkit FTU FDD-Freebie-Paperdoll
hier
Tube deiner Wahl
Ich habe für dieses Tutorial eine Tube von
Leonardo55 genutzt -Alexia
Du kannst sie hier kaufen
http://picsfordesign.com
Maske Vix_BigMask015
VIX
Plugin
alien skin eye candy 5 impact -gradient glow
Öffne ein neues Bild
600x600 Pixel
öffne FDD-el-deco 1
verkleinern um 19%
kopieren und in dein bild einfügen
ebene umbenennen
deco1
neue Ebene
Füllen mit Farbe # ae3d4a
Ebene-
Maske laden / speichern
Maske aus Datei laden
vix_mask 15
Helligkeit der Quelle an
an Leinwand anpassen
Last
Gruppe zusammenfassen
Effekte-Alien Skin Impact 5-Gradient Glow-
Ghost Text
mit meinen Einstellungen

umbenennen Maske
öffne FDD-el-frame4
kopieren und in dein bild einfügen
ebene umbenennen
Rahmen
mit Zauberstab
in den Rahmen klicken
geh auf Auswahl ändern-vergrößern 10
neue ebene
ebene unter die ebene Rahmen schieben
kopieren pa04
und in die auswahl einfügen
umbenennen Framefill
Kopieren und Einfügen
FDD-el-glitter1
lösch alles was im Rahmen ist
ebene unter die ebene Rahmen schieben
umbenennen glitter
öffne deine Tube
kopieren und in dein bild einfügen
ebene umbenennen
tube
nehme das Auswahl-Werkzeug
rechteck-und ziehe die auswahl wie ich

Strg-C
neue ebene
schiebe sie über den Rahmen
Einfügen in Auswahl
deaktivieren
umbenennen tube2
nun geh zur ebene mit der tube und mach
Effekte-3d-Schlagschatten
02.02 100 unschärfe 18 Farb # 000000
öffne FDD-el-deco5
Ändern die größe ein wenig
setz sie auf die linken Seite
umbenennen DECO 5
Schlgschatten deiner Wahl
öffne FDD-el-leave1-
verkleinern 60%
Kopieren und Einfügen
setz sie über das blatt
Effekte-3d-Schlagschatten
umbenennen blume
Dupliziere sie verkleinern -50%
Platz sie auf blume
dreh ein wenig nach links
öffne FDD-el-Tag4
verkleinere sie 2 x um 80 %
Kopieren und Einfügen
Platzie auf der linken Seite
dreh es wie du magst
umbenennen tag
Schlagschatten
ebenen deco1 & Maske
unsichtbar stellen
alle anderen Ebenen sichtbar zusammenfassen
Schlagschatten
ebenen deco1 & Maske
sichtbar stellen
alle Ebenen sichtbar zusammenfassen
nun noch deinen Namen drauf
und denk dran die lizenzenummer und das Copy auf dein taggi zu setzen
Alexia

Supplies Needed:
PSP
font of choice
Scrapkit FTU FDD-Freebie-Paperdoll
tube of choice
I used
Leonardo55_Alexia
you can get at
http://picsfordesign.com
In order to use the images in this
tutorial you must purchase them from http://picsfordesign.com
Mask Vix_BigMask015
Plugin
alien skin eye candy 5 impact -gradient glow
new image
600x600 pixels
open Fdd-el-deco 1
resize 19 %
copy -paste
to your image
rename deco1
new layer
fill with color #ae3d4a
layers-
load/save mask
load mask from disk
vix_mask 15
source luminance
fit to canvas
load
merge group
effects-alien skin impact 5-gradient glow-
ghost text with my settings

rename mask
open fdd-el-frame4
copy-paste
to your image as a new layer
rename Frame
using magic wand tool
click into the frame
go to selection- modify-expand-10
add new layer
arrange under frame
copy and paste
into selection pa4
rename Framefill
copy and paste
fdd-el-glitter1
erase all in the frame
arrange under frame
rename glitter
copy and paste
your tube
arrange under the frame layer
rename tube
take your selection tool
Rectangle-make it like me

ctrl-C
add new layer
arrange over the frame
paste into selection
deselect
rename tube2
go to layer tube
effects-3d- dropshadow
2/2 100 Blur 18 color #000000
open fdd-el-deco5
resize a little
placement on left side
rename deco 5
dropshadow of your choise
open fdd-el-leave1-
resize 60 %
copy-paste
placement on left side
effects-3d- dropshadow
rename leave
duplicate -resize-50 %
place on left side
rotate a little to left
open fdd-el-tag4
resize 80 %
2 x
copy-paste
placement on left side
rename tag
dropshadow
layer deco1 & mask
invisible
go layer tag
merge visible
dropshadow
layer all visible
merge-visible
add name
add artist copyrights
Abonnieren
Posts (Atom)
My Scrapblog
i use for my Works


Bloghits
Freebies

