About Me
- Redbutterfly78
- Eigentlich erwachsen aber immer noch vielzuviel Kind in mir ... a big girl but a little girl inside of me
My Blinkie
Ct From


I Use Tube from


Dienstag, 12. Juli 2011
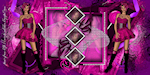
Kiss me....

Supplies
1 tube of choice - I used the artwork of Ismael Rac
1 tube of choice - I used the artwork of Ismael Rac
here
save in your Mask Folder
This tutorial was created with Lysiras Graphic World - Kiss me kit.
It is available at Heartbeatz Creationz.
save in your Mask Folder
This tutorial was created with Lysiras Graphic World - Kiss me kit.
It is available at Heartbeatz Creationz.
You can visit lys blog here.

*Let’s get started*
Open up a 700 x 700 blank canvas.
fill with lgw_kiss_me_paper10
go Layers-load/save Mask-
load mask from disc-
from the heart Mask 3
select
fit to layer
Deselect Invert Transparency
Merge Group
rename Mask1
new layer
Fill with Paper
lgw_kiss_me_paper01
go Layers-load/save Mask-
load mask from disc-
mask181_sigrid
select
fit to layer
Deselect Invert Transparency
Merge Group
now you go to Selection-
select all-
selection-Modify-contract
8
selection-invert-cut
deselect
go to effects
Alien Skin-eye candy 5 Impact-Gradien Glow
Ghost Text

rename Mask2
Copy and paste Element
lgw_kiss_me_colordrops01 as a new layer
arrange under layer Mask 2
rename deco 1
placement on left top side
Duplicate-
Image- Mirror
Image -Filp
rename deco2
go to layer Mask 2
activate
Copy and paste Element
lgw_kiss_me_ribbon02 as a new layer
placement on left side
dropshadow
0/0
62
Blur 9
rename ribbon
Copy and paste Element
lgw_kiss_me_flower02 as a new layer
resize 50 %
deselect all layers
effects
Reflection-kaleidoscope

Dropshadow
rename flower
new layer
go to your selection tool
make a selection
from the middle of the left flower to the right flower
fill with
lgw_kiss_me_paper02
now you go to Selection-
selection-Modify-contract
15
Cut
rename frame
arrange under layer Flower
merge layer Flower down to layer-frame
Now drag this frame in the picture down
copy your tube
paste as a new layer
placement of your choise
arrange under layer Ribbon
rename tube 1
take your selection tool
Rectangle-make it like me

ctrl-C
add new layer
arrange over the frame
paste into selection
rename tube 2
go to layer tube 1
effects-3d- dropshadow
2/2 100 Blur 18 color #000000
Copy and paste Element
lgw_kiss_me_plate01 as a new layer
resize 50 %
placement of your choise
Merge all layer visible
add name
add artist copyrights
Abonnieren
Kommentare zum Post (Atom)
My Scrapblog

i use for my Works


Bloghits
Freebies


0 Kommentare:
Kommentar veröffentlichen