About Me
- Redbutterfly78
- Eigentlich erwachsen aber immer noch vielzuviel Kind in mir ... a big girl but a little girl inside of me
My Blinkie
Ct From


I Use Tube from


Posts mit dem Label ~Bello Scarto~ werden angezeigt. Alle Posts anzeigen
Posts mit dem Label ~Bello Scarto~ werden angezeigt. Alle Posts anzeigen
Montag, 26. September 2011
Happy days
 05:07 |
 Eingestellt von
Redbutterfly78


Supplies
1 tube of choice -
I used
1 tube of choice -
I used
Zlata_M
you can get at
http://picsfordesign.com/en/
PTU Kit ~from Bello Scarto
and my Template

ok let´s begin
open my Template
delete copy
flood Fill tool
RGB Value Tolerance 36
Foreground
Angle 0/ Scale 100
go to layer
Back
flood Fill tool
RGB Value Tolerance 36
Foreground
Bello_june10_happydays_paper3
Angle 0/ Scale 100
fill Back
Dropshadow
0/0/100/7
Layer Doodle1
Adjust-Hue & saturation
Colorize
200/255
Dropshadow
1/1/100/1
Repeat with -1
Layer Fill1 &Fill 2
flood Fill tool
RGB Value Tolerance 36
Foreground
Bello_june10_happydays_paper8
Angle 0/ Scale 100
fill
Layer fill1frame&fill2frame
flood Fill tool
RGB Value Tolerance 36
Foreground
Bello_june10_happydays_paper10
Angle 0/ Scale 100
fill
Dropshadow
1/1/100/10
Repeat with -1
Layer Doodle2
Adjust-Hue & saturation
Colorize
187/144
Dropshadow
1/1/100/1
Repeat with -1
Layer Fill3 &Fill 4
flood Fill tool
RGB Value Tolerance 36
Foreground
Bello_june10_happydays_paper9
Angle 0/ Scale 100
fill
Layer fill3frame&fill4frame
Adjust-Hue & saturation
Colorize
212/144
Dropshadow
1/1/100/1
Repeat with -1
Bello_june10_happydays_element25
resize 25 %
move to the left top from fill1 frame
Dropshadow
1/1/100/10
Repeat with -1
Duplicate -Mirror
open your tube
copy paste as a new layer
delete copy
flood Fill tool
RGB Value Tolerance 36
Foreground
Angle 0/ Scale 100
go to layer
Back
flood Fill tool
RGB Value Tolerance 36
Foreground
Bello_june10_happydays_paper3
Angle 0/ Scale 100
fill Back
Dropshadow
0/0/100/7
Layer Doodle1
Adjust-Hue & saturation
Colorize
200/255
Dropshadow
1/1/100/1
Repeat with -1
Layer Fill1 &Fill 2
flood Fill tool
RGB Value Tolerance 36
Foreground
Bello_june10_happydays_paper8
Angle 0/ Scale 100
fill
Layer fill1frame&fill2frame
flood Fill tool
RGB Value Tolerance 36
Foreground
Bello_june10_happydays_paper10
Angle 0/ Scale 100
fill
Dropshadow
1/1/100/10
Repeat with -1
Layer Doodle2
Adjust-Hue & saturation
Colorize
187/144
Dropshadow
1/1/100/1
Repeat with -1
Layer Fill3 &Fill 4
flood Fill tool
RGB Value Tolerance 36
Foreground
Bello_june10_happydays_paper9
Angle 0/ Scale 100
fill
Layer fill3frame&fill4frame
Adjust-Hue & saturation
Colorize
212/144
Dropshadow
1/1/100/1
Repeat with -1
Bello_june10_happydays_element25
resize 25 %
move to the left top from fill1 frame
Dropshadow
1/1/100/10
Repeat with -1
Duplicate -Mirror
open your tube
copy paste as a new layer
arrange to a place in your Pic...
merge all visible
copyrights and any other text you would like to add.
 Labels:

Sonntag, 4. September 2011
Cold Cold Heart

Supplies
1 Artist's tubes -
I've used the beautiful artwork of
Barbara Jensen
1 Artist's tubes -
I've used the beautiful artwork of
Barbara Jensen
tube i use is
please don't use without a license.
PTU Kit ~from Bello Scarto
Cold, Cold Heart
It is available at
here
save in your Mask Folder
~Font of choice ~
Plugins
Alien skin Eye Candy 5/gradient Glow
ok let´s begin
save in your Mask Folder
~Font of choice ~
Plugins
Alien skin Eye Candy 5/gradient Glow
ok let´s begin
Open new Image
800x800
800x800
fill with # 12171b
go to
Layer-/Load/save Mask
search STD 304
search STD 304
fit to canvas
invert select
merge group
invert select
merge group
resize 90 % deselect all layers
rename mask
new layer
go to your selection Tool
custom Selection

open bs_cch_paper1
copy go to your pic
paste into a selection
deselect
dropshadow
rename stripe1
new layer
go to your selection Tool
custom Selection

foreground -bs_cch_paper9
angle 0 scale 100
fill
deselect
dropshadow
rename stripe2
new layer
go to your selection Tool
custom Selection

open bs_cch_paper1
copy go to your pic
paste into a selection
deselect
drop shadow rename stripe3
duplicate-image flip
drop shadow
rename stripe4
open bs_cch_element12
copy
paste
new layer
go to image-rotate-free 90 right
new layer
go to image-rotate-free 90 right
deselect- all layers and rotate please
resize 75 % x2
move it up and left, so it looks like mine

dropshadow
rename bow left
duplicate-mirror-flip
rename bow right
open bs_cch_element1
copy
paste as a new layer
resize 50 %
move it to the right top
dropshadow
rename heart 1
open bs_cch_element2
copy
paste as a new layer resize 50 %
and moving it to the lower left
rename heart 2
arrange under layer 4 bow left
go to your selection Tool
custom Selection

fill with #adc2d3
selection-modify-
contract 15
STRG + X
rename frame
new layer
arrange under layer Frame
selection-modify-expand 5
fill with bs_cch_paper10
open your tube
copy paste as a new layer
arrange under layer Frame
copy paste as a new layer
arrange under layer Frame
go to your selection tool
take your selection tool
Rectangle-make it like me
Rectangle-make it like me

ctrl-C
add new layer
arrange over the layer heart2
add new layer
arrange over the layer heart2
paste into selection
deselect
deselect
go to layer with the tube 1
go to effects
Alien skin Eye Candy 5/gradient Glow
Ghost text

merge all visible
copyrights and any other text you would like to add.
copyrights and any other text you would like to add.
Dienstag, 30. August 2011
Forest Faerie

Supplies
1 tubes -
I've used the beautiful artwork of
PSP GIRL
You found her Blog
1 tubes -
I've used the beautiful artwork of
PSP GIRL
You found her Blog
Mask from here
sophia-grungemask1
Plugins
Alien Skin Xenofex 2/constellation
Alien skin Eye Candy 5/gradient Glow
ok let´s begin
*******************************************
Open new Image
900x900
900x900
fill with #3ab5e1
Alien Skin Xenofex 2/constellation

new Layer
foreground #bbe456
background #608d01
make gradient with this
linear
angle 0
repeats 0
inverts deselect
make gradient with this
linear
angle 0
repeats 0
inverts deselect
fill
go to layer/Load/save Mask
search grungemask1
Fit to canvas
deselect-invert transperency
merge group
deselect-invert transperency
merge group
effects -eye candy -glow

Open bello-2011-ffa-element34 -
Copy and paste as a new layer.
move a little to left .
Give it a drop shadow of your choice.
Copy and paste as a new layer.
move a little to left .
Give it a drop shadow of your choice.
Copy and paste as a new layer.
move a little to right .
Give it a drop shadow of your choice.
Copy and paste as a new layer.
move a little to down .
Give it a drop shadow of your choice.
resize 50 %
Copy and paste as a new layer.
move a little to right
duplicate move a little to left .
Open bello-2011-ffa-element32
resize 50 %
Copy and paste as a new layer.
move a little to right
duplicate move a little to left
copy and paste
your tube
your tube
take it to a place of your choice
dropshadow
merge all visible
resize to 76%
resize to 76%
deselect all layers
Copy and paste as a new layer.
Go to effects-reflection-kaleidoscope

merge all visible
copyrights and any other text you would like to add.

Freitag, 22. Juli 2011
alone in Paradise

Supplies
1 Artist's tubes -
I've used the beautiful artwork of
misticheskaya
1 Artist's tubes -
I've used the beautiful artwork of
misticheskaya
You can purchase her tubes at her store
HERE
please don't use without a license.
PTU Kit ~Gypsy Rosa - Li
from
Bello Scarto
It is available at
open vix mask in your PSP
minimize
minimize
new image 650 x650
select all
Open bello-2011-grl-paper2
.Copy and paste it into a selection
deselct
go to Layer-
New mask layer-from image-
mask vix250
deselect -invert mask data
deselect -invert mask data
merge group
rename back
Open bello-2011-grl-element40.
Copy and paste as a new layer. Resize by 80%
position on the left side on top
rename rainbow
Open bello-2011-grl-element44.
Copy and paste as a new layer. Resize by 60%.
Move the lower left hand side of your frame.
Give it a drop shadow of your choice.
Duplicate it
resize 60 %
merge down
Duplicate it
and mirror
rename grass
Open bello-2011-grl-element34.
Copy and paste as a new layer. Resize by 60%.
Move the left hand side of your frame.
Give it a drop shadow of your choice.
Open bello-2011-grl-element34.
Copy and paste as a new layer. Resize by 60%.
Move the left hand side of your frame.
Give it a drop shadow of your choice.
rename bridge
open your tube
resize to 650pix
copy paste as a new layer
position on the bridge
rename tube 1
Open bello-2011-grl-element10. Copy and paste it as a new layer.
Go to image effects-reflection-kaleidoscope
. Leave where it is.

rename frame
Open bello-2011-grl-element51.
Copy and paste as a new layer.
Move the left hand side of your frame.
Give it a drop shadow of your choice.
Resize by 60%.
Move little to left
merge down
duplicate
mirror
rename mushroom
Open bello-2011-grl-element6.
Copy and paste as a new layer. Resize by 40%.
Move the left hand side of your frame.
Give it a drop shadow of your choice.
Duplicate it and mirror.
duplicate flip
duplicate mirror
rename bow1 bow 2 bow 3 bow 4
go to layer tube 1
take your selection tool
Rectangle-make it like me

ctrl-C
add new layer
arrange over the layer bow4
paste into selection
deselect
go to layer with the tube 1
dropshodow of your choise
merge all visible
copyrights and any other text you would like to add.
Dienstag, 5. Juli 2011
Burlesque

Supplies Needed:
PSPFont of choice
Scrapkit PTU-Burlesque
PSPFont of choice
Scrapkit PTU-Burlesque
tube of choice
I used
Leonardo55_Alexia
you can get at
http://picsfordesign.com
In order to use the images in this tutorial you must purchase them from
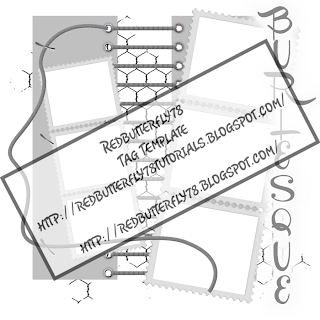
Open the template,
Ctrl & D to duplicate and close the Original.
layer copy delete
Paper07-layer 1+2
Layer4 -colorize of your choise
paper4 -layer5
new raster
copy your tube
paste into selection
opacity 54
deselect
same with layer 6
Layer wire ,shadow1,2,3,4,9,words ,wordshadow,pin1-3,invisible
go layer 5
merge visible
dropshadow
0/0
62
Blur 9
layer all visible
layer word
selection-select all-
selecton Float-defloat
fill with color #4b1312
Dropshadow
Layer9 -colorize of your choise
activate layer pin 3
copy element 14
to your image as a new layer
placement on left side from the big frame
Dropshadow
copy element 36
to your image as a new layer
resize a little
placement on left side
Dropshadow
copy element 8
to your image as a new layer
resize a little
placement on left top side
arrange under the pin layer
Dropshadow
copy your tube
paste as a new layer resize of 550 pix
please think deselect all layers
Move to the end of the pic
Dropshadow
2/2
62
Blur 17
the same with -2/-2
Merge visible
Add your name ,your copyright and licence numbers
layer copy delete
Paper07-layer 1+2
Layer4 -colorize of your choise
paper4 -layer5
new raster
copy your tube
paste into selection
opacity 54
deselect
same with layer 6
Layer wire ,shadow1,2,3,4,9,words ,wordshadow,pin1-3,invisible
go layer 5
merge visible
dropshadow
0/0
62
Blur 9
layer all visible
layer word
selection-select all-
selecton Float-defloat
fill with color #4b1312
Dropshadow
Layer9 -colorize of your choise
activate layer pin 3
copy element 14
to your image as a new layer
placement on left side from the big frame
Dropshadow
copy element 36
to your image as a new layer
resize a little
placement on left side
Dropshadow
copy element 8
to your image as a new layer
resize a little
placement on left top side
arrange under the pin layer
Dropshadow
copy your tube
paste as a new layer resize of 550 pix
please think deselect all layers
Move to the end of the pic
Dropshadow
2/2
62
Blur 17
the same with -2/-2
Merge visible
Add your name ,your copyright and licence numbers
Abonnieren
Posts (Atom)
My Scrapblog

i use for my Works


Bloghits

Freebies


